

An industrial piercing is one of the most striking ear modifications you can get. This unique style demands precise planning and premium materials to ensure a safe, clean healing process.
Our comprehensive industrial piercing guide covers everything you need to know about this dual-helix cartilage modification. An industrial piercing involves two separate holes in the upper ear cartilage connected by a single straight barbell. Because it links two distinct wounds, this piercing carries specific risks like cartilage infections or allergic reactions to low-quality metals. Safe healing requires a professional piercer, precise anatomical alignment, and high-quality materials like ASTM F136 implant-grade titanium. Full recovery takes six to twelve months of dedicated daily care to prevent complications.
If you are considering this popular double cartilage piercing, understanding the anatomy and healing requirements is vital. We will start by exploring the structure of this modification in What Is an Industrial Piercing? Here is how the process works.
Ready to book your industrial piercing? Schedule a consultation at Z Edge Piercing in Sarasota or Venice to discuss your placement options with our professional piercers.
Industrial Piercing Guide: What Is an Industrial Piercing?
An industrial piercing, also called a scaffold piercing, is a double cartilage modification where two holes in the upper ear are connected by a single straight barbell. This style requires precise anatomy including a prominent helix ridge, professional placement to prevent migration, and implant-grade titanium or nickel-free gold jewelry for safe healing.
The types of ear piercings available today range from simple lobe piercings to complex cartilage designs. Among these options, the industrial piercing stands out as a bold and structured choice. Sometimes called a scaffold piercing, this modification involves two separate holes in the upper cartilage of the ear that are joined by a single long barbell. To understand if this style fits your personal aesthetic and goals, it helps to learn about the anatomy, history, variations, and physical needs of this unique ear project.
Anatomy of the Ear Project
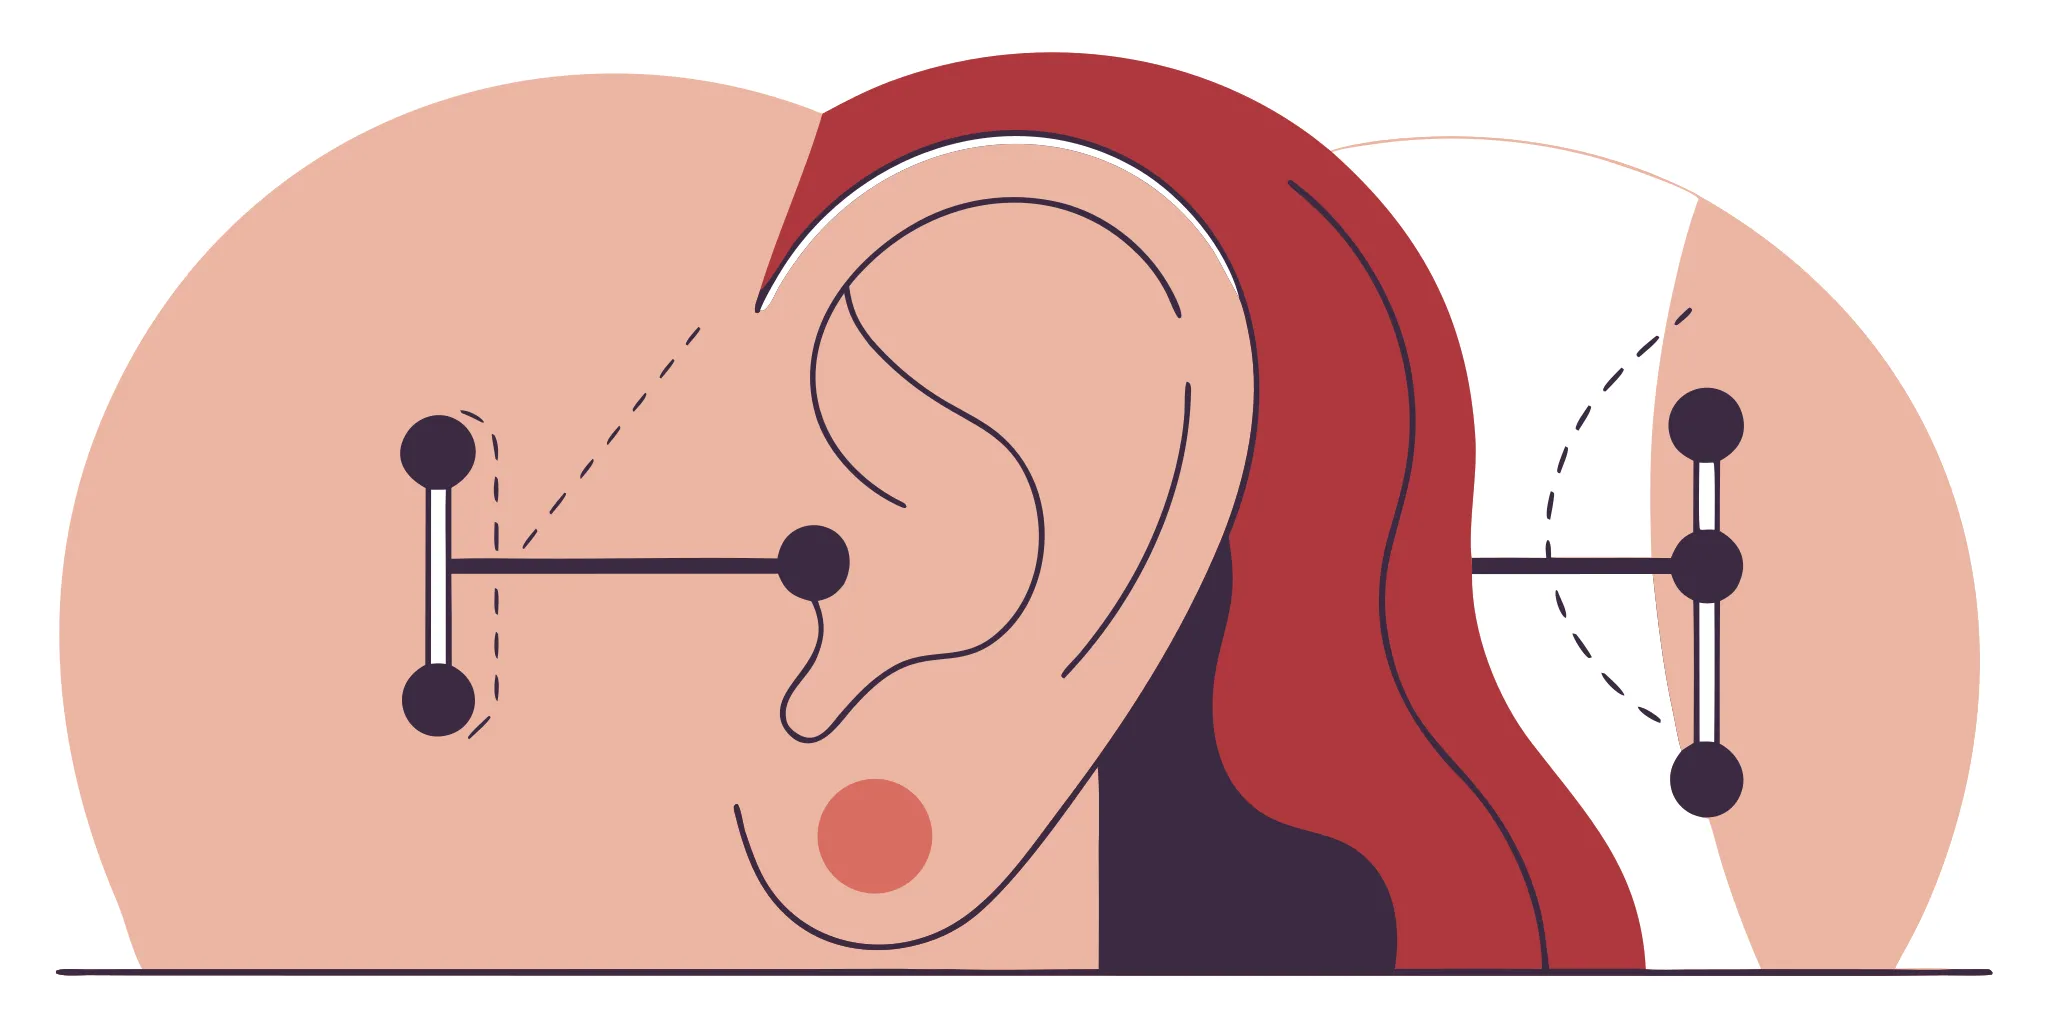
A standard industrial piercing passes through two distinct areas of the upper ear cartilage. The first hole is made in the helix, which is the outer rim near the top of your ear. The second hole goes through the forward helix, which is the inner rim closest to your head. A straight metal barbell then connects these two points. Because a single rigid bar must guide both holes. Your ear shape must have a pronounced outer ridge and enough flat space to allow the bar to rest without pressing against the inner cup of your ear. Known as the scapha. If your ear lacks these precise physical curves, the metal bar can cause pressure sores or tissue damage over time.
History and Style Types
This distinct look has a rich history in the piercing world. The style was first developed and named by well-known piercer Erik Dakota in 1992. Since then, the concept has grown to include several unique style paths. A standard setup runs horizontally across the top of the ear. A vertical industrial, on the other hand, runs up and down, often connecting the top of the helix to the conch or lower part of the ear. Some people also choose chain styles, where two separate studs are linked by a delicate metal chain. This chain option is often a great alternative if your ear shape cannot support a straight, rigid bar.
Why Professional Placement Matters
Getting a scaffold piercing requires a high level of skill and precision. The piercer must line up the angles of both holes perfectly so that the straight bar does not pull or put stress on the healing cartilage. If the angle is off by even a tiny fraction, the constant tension can lead to migration, rejection, or bumps. Selecting a master piercer who understands ear piercing terminology and cartilage anatomy is the best way to ensure your piercing is placed safely. A professional will study your ear shape, mark the path carefully, and select the correct bar length to allow for normal swelling during the initial healing phase.
When selecting your jewelry, material safety should always come first. Poor quality metals can cause severe allergic reactions, swelling, and delayed healing. To keep your new cartilage channels safe, professional studios use high-quality materials. According to medical guidelines from the Mayo Clinic, certain jewelry metals can trigger allergic skin reactions, which is particularly true for metals that contain nickel. This is why top studios use implant-grade metals instead of cheap steel alloys to ensure a smooth, safe healing journey.
Does an Industrial Piercing Hurt? Pain Level and What to Expect
Yes, an industrial piercing hurts more than a standard lobe piercing because it involves two separate punctures through dense ear cartilage. Most people rate the pain between 5 and 7 out of 10. The procedure delivers a sharp pinch for each needle pass, followed by a throbbing ache that typically fades within a few days of proper care.
Pain is the first concern for most people considering an industrial piercing. Because this style requires two separate punctures through thick ear cartilage, it is more intense than a standard lobe piercing. Most people rate the sensation between a five and a seven out of ten. Your piercer must make two needle passes in a single session, which adds to the immediate discomfort.
Why Cartilage Piercings Hurt More
Unlike soft earlobes, upper ear cartilage is dense and lacks a rich blood supply. This tissue is much tougher to pierce, which leads to a more intense, dull pressure during the procedure. According to clinical guides on piercing safety from the Mayo Clinic, cartilage piercings carry unique structural challenges and physical sensations compared to skin piercings. The first puncture is usually a quick pinch, while the second puncture may feel more intense because your body is already aware of the sensation.
Factors That Influence Your Pain
Your actual pain level depends on your personal tolerance, your physical state, and the skill of your professional piercer. At Z Edge Piercing, our staff uses swift, precise techniques to minimize your discomfort and ensure the process is as quick as possible. Your ear shape also plays a major role, as proper alignment is key to a successful placement. To learn more about our professional services and options, you can check our piercing pricing page for details. Our experienced team works to keep you calm and comfortable throughout the entire visit.
What the Sensation Feels Like
Most clients describe the first few seconds as a sharp pinch followed by a warm, throbbing sensation. Once the barbell is in place, the sharp pain fades into a dull ache that lasts for the first few days. This initial throbbing is a normal part of the process as your body starts to heal the new holes. If you are curious about how this fits with other placements, you can explore the various types of ear piercings to compare their typical sensations and healing times.
Industrial Piercing Healing Timeline: Stages and Milestones
An industrial piercing takes 6 to 12 months to fully heal because it involves two cartilage punctures with limited blood flow. The healing process progresses through four stages: acute swelling (weeks 1-2), crusting and itching (weeks 2-8), internal channel stabilization (months 2-6), and full cartilage maturity (months 6-12). Consistent daily aftercare is essential throughout.
The healing journey for an industrial piercing is complex because it involves two separate cartilage punctures linked by a single rigid barbell. Unlike a soft earlobe, cartilage has limited blood flow, which prolongs the recovery process. While minor skin piercings heal in weeks, a dual-cartilage piercing requires constant care to prevent major health risks like cartilage infection. According to research on auricular perichondritis, serious cartilage damage and permanent ear shape changes can occur if these deep ear piercings do not heal correctly.
You can expect the full healing cycle to last anywhere from 6 to 12 months. Understanding the normal healing stages helps you monitor your progress and identify potential complications early. Below are the key phases you will experience as your ear fully matures.
-
Stage 1: Acute Swelling and Redness (Weeks 1 to 2)
During the first fortnight, your upper ear will experience significant throbbing, swelling, and localized redness. It is common to see minor bleeding or clear fluid discharge that forms crust around the entry points. During this early window, it is highly useful to review ear piercing terminology so you can accurately describe your anatomy and symptoms if you need to contact your professional piercer for advice.
-
Stage 2: The Crusting and Itching Phase (Weeks 2 to 8)
As the acute swelling subsides, your body begins to build a channel of skin called a fistula inside each hole. During this phase, lymphatic fluid will dry into yellow crust around the metal barbell. Your ear may also itch intensely as the tissue repairs itself. You must never pick at these crusts or twist the bar, as doing so tears the delicate new skin cells growing inside the wound.
-
Stage 3: Internal Channel Stabilization (Months 2 to 6)
By the second month, the exterior skin looks mostly healed, and the constant soreness fades. However, the inner cartilage path remains highly fragile. The tissue continues to strengthen, but sleeping on your ear or catching the bar on your clothes can easily cause sudden flare-ups or localized swelling. To keep your recovery on track, you can explore other types of ear piercings to learn how cartilage heals differently compared to lobe tissue.
-
Stage 4: Full Cartilage Maturity (Months 6 to 12)
This is the final stage where the two cartilage channels fully mature and tighten around the barbell. The tissue becomes strong enough to withstand light movement without swelling or pain. According to the official Z Edge industrial piercing care guide, full cartilage healing requires a minimum of 6 to 12 months before you should attempt to swap your jewelry. Even after one year, you should keep jewelry in the holes at all times to prevent them from closing.
Best Jewelry Options for Your Industrial Piercing
The best jewelry for an industrial piercing is a straight barbell made from ASTM F136 implant-grade titanium or nickel-free 14k gold. Standard sizing uses a 14-gauge bar with a length that accommodates your anatomy. Avoid surgical steel entirely because it contains nickel that triggers allergic reactions and delays healing. A longer initial bar allows room for swelling.
Selecting the right jewelry is a key step in your healing process and long-term comfort. The shape, size, and material of your initial bar can determine how well your body accepts the piercing. For a safe and successful result, you must know what options are available and which metals to avoid.
Recommended Jewelry Materials
The metal you put in your ear affects how fast you heal and your risk of a skin reaction. Studies from the Mayo Clinic show that jewelry made of nickel can cause allergic skin reactions. Because of this risk, you should avoid standard surgical steel. Steel contains high amounts of nickel and is an inferior choice for new piercings. It can lead to swelling, itching, and slow healing times.
To keep your skin safe, Z Edge Piercing uses only ASTM F136 implant-grade titanium and nickel-free 14k gold. Titanium is a pure metal that does not react with body fluids, which helps prevent cartilage irritation. Solid 14k gold is also an excellent option as long as it is completely nickel-free. Both materials provide a smooth surface that protects your new ear channel while it heals.
Sizing and Barbell Shapes
An industrial piercing typically uses a straight barbell to connect the two holes. However, you can also use a flexible chain or a curved barbell once the path is fully healed. The standard thickness for this piercing is a 14-gauge bar. A bar that is too thin can migrate or tear through your cartilage over time.
The length of your bar must match your unique ear shape. Your piercer will start with a longer barbell to allow room for initial swelling. Once the tissue heals, you can switch to a shorter bar for a flush fit. You can find more detail about correct bar lengths in our industrial piercing jewelry sizing guide. Using the right fit keeps the metal from snagging on your hair or clothes.
Industrial Piercing Aftercare: Essential Do's and Don'ts
Proper industrial piercing aftercare requires twice-daily cleansing with sterile saline spray, gentle drying with disposable paper towels, and avoiding any twisting or rotating of the jewelry. Never use alcohol, hydrogen peroxide, or harsh soaps. Sleep on the opposite side and keep headphones, hats, and hair accessories away from the healing cartilage to prevent irritation.
Proper aftercare is the most critical factor in healing your cartilage. Because this style links two separate cartilage holes, any movement or pressure on one side affects the other. Neglecting your daily routine can lead to irritation or severe cartilage infections.
Your Daily Cleansing Routine
You must clean your fresh ear piercing twice every day. Use a sterile saline spray to flush both entry and exit points on your ear. This simple step keeps the tissue clean without causing irritation.
- Spray with sterile saline: Use a sterile saline spray twice daily to flush the entry and exit points of the piercing. This gentle step keeps the tissue clean without causing irritation.
- Dry the area gently: Blot the skin dry with a clean, disposable paper towel. Do not use cloth towels, as they can harbor bacteria or snag on your industrial piercing jewelry sizing barbell.
- Do not twist the bar: Leave the barbell completely alone while it heals. Do not twist, rotate, or pull the jewelry, as this disrupts new skin cells and introduces bacteria deep into the channel.
- Avoid harsh chemicals: Never apply rubbing alcohol, hydrogen peroxide, or harsh soaps to the area. These products dry out the skin, delay healing, and can cause a severe allergic reaction to inferior metals.
- Prevent physical pressure: Avoid sleeping on the side of your new piercing. You should also skip headphones, tight hats, or hair accessories that press against your ear cartilage.
Minimize Your Metal Allergy Risk
Using the wrong jewelry material is a common cause of healing failures and skin irritation. Many people experience a major nickel allergy when using low-quality steel barbells. This reaction triggers swelling, itching, and redness that prevents your ear from healing properly.
To avoid these complications, Z Edge uses only ASTM F136 implant-grade titanium and nickel-free 14k gold. These hypoallergenic materials do not contain nickel, which helps minimize your risk of allergic reactions and supports a smoother healing process.
Industrial Piercing Risks and How to Minimize Them
The main risks of an industrial piercing include cartilage infections called perichondritis, keloid scarring, irritation bumps, and allergic reactions to nickel-containing metals. These complications can be minimized by choosing an experienced professional piercer, using only implant-grade titanium or nickel-free gold jewelry. Maintaining strict hygiene, and monitoring for early warning signs like excessive swelling or discharge.
An industrial piercing comes with real risks that every candidate should understand before committing. Because cartilage has poor blood flow, it is more prone to issues than soft tissue. Knowing the warning signs and how to avoid problems is a key part of your types of ear piercings research.
Cartilage Infections
The most severe risk is a cartilage infection called perichondritis. According to a study in academic medical reports, perichondritis is a serious ear piercing complication that can cause cartilage tissue death and permanent ear deformity. This issue often starts from bad hygiene, touching the wound with dirty hands, or using dirty tools. Early warning signs include intense throbbing pain, deep redness, severe swelling, and hot skin around the holes. If you notice yellow pus or run a fever, seek medical care right away.
Keloids and Irritation Bumps
Keloids are another potential issue for any cartilage wound. As noted by the Mayo Clinic, keloids are raised areas on the skin caused by an overgrowth of scar tissue. These firm, fibrous bumps can grow much larger than the original wound. They are different from simple irritation bumps, which are small, soft fluid pockets caused by friction or pressure. You can minimize both issues by choosing an expert piercer who aligns the jewelry perfectly to prevent constant tension on the ear.
Allergic Reactions and Metal Sensitivities
Using the wrong jewelry metal can cause severe swelling, itching, and fluid drainage. Cheap metals like nickel often trigger strong skin reactions. To prevent this, Z Edge uses only premium ASTM F136 implant-grade titanium and nickel-free 14k gold. These high-grade materials are biocompatible and greatly reduce your risk of a reaction. To ensure a safe fit, you should also read our guide on industrial piercing jewelry sizing to match the barbell length to your anatomy.
How Much Does an Industrial Piercing Cost at Z Edge?
An industrial piercing at Z Edge Piercing typically costs between $96 and $200 depending on your jewelry choice. The professional service fee is $80 to $100, and implant-grade titanium barbells range from $16 to $61. Nickel-free 14k gold options start at $82, and lab-grown diamond barbells start at $83. No hidden fees apply.
When planning your piercing, understanding the total price helps you choose the best options. At Z Edge Piercing, we offer a clear, upfront pricing structure with no hidden fees. The final price depends on the specific jewelry you choose to match your style and needs.
Understanding Our Service and Jewelry Pricing
Our pricing model splits the cost into two simple parts: the professional piercing service fee and the cost of the jewelry itself. The expert piercing service fee for a double cartilage connection ranges from $80 to $100. This fee covers our professional placement, sterile setup, and single-use tools. You then choose your barbell from our premium, nickel-free jewelry options.
The cost of your jewelry depends on the metal you select. High-quality body jewelry is vital to prevent allergic reactions, which are frequent with cheap metals like nickel. We use only safe, premium metals for new piercings. Our implant-grade titanium barbells range from $16 to $61. For a luxury upgrade, our nickel-free 14k gold options start at $82, and barbells featuring lab-grown diamonds start at $83.
Industrial Piercing Cost Scenarios
To help you budget, we have mapped out three typical paths for your visit. Most clients spend between $100 and $200+ total. You can view our full piercing price details online before your visit to Sarasota or Venice.
| Setup Option | Service Fee | Jewelry Price | Estimated Total |
|---|---|---|---|
| Basic Titanium Setup | $80 - $100 | $16 - $61 | $96 - $161 |
| 14k Gold Upgrade | $80 - $100 | $82+ | $162+ |
| Premium Lab-Grown Diamonds | $80 - $100 | $83+ | $163+ |
Why Quality Materials Matter for Your Budget
Choosing high-quality metals saves you money on long-term care. Cheap steel jewelry often contains nickel, which can lead to swelling, irritation, and slow healing. Investing in premium metals from the start reduces the risk of rejection or infection. Visit Z Edge today to explore our vast range of safe, beautiful jewelry options.
Frequently Asked Questions
Can you sleep on an industrial piercing while it heals?
No, you should not sleep on a new industrial piercing. Putting pressure on the ear can cause irritation, swelling, and jewelry migration. According to the aftercare guidelines on Z Edge Piercing, keeping pressure off the area is essential for proper healing. If you are a side sleeper, you can use a travel pillow and place your ear in the center hole to avoid contact.
How long does it take for an industrial piercing to heal completely?
An industrial piercing typically takes about 6 to 12 months to heal completely. This long timeline is normal for cartilage piercings because cartilage has limited blood flow compared to earlobes. You can read more about recovery phases in the Z Edge Piercing guides. It is crucial to continue your daily cleaning routine even when the skin looks healed on the outside.
What is the best metal for a new industrial piercing?
The best metals for a new industrial piercing are implant-grade titanium and high-quality gold. According to the Mayo Clinic, cheap jewelry metals like nickel often trigger severe skin allergies. To prevent these issues, Z Edge uses ASTM F136 implant-grade titanium and nickel-free 14k gold. Avoid low-quality steel barbells because they can release nickel and delay your healing process.
Can you get an industrial piercing with two separate bars?
Yes, you can start an industrial piercing with two separate studs or bars if your ear shape requires it. This method can reduce pressure and make early healing easier. However, the holes must align perfectly so a single straight barbell can fit through them later. You can learn more about barbell styles and alignment in our industrial piercing jewelry sizing guide.
Ready to Get Your Industrial Piercing?
An industrial piercing needs precise alignment to heal correctly and look great. Choosing an amateur piercer can lead to bad angles, severe pain, and permanent scarring on your ear cartilage. Start your safe piercing journey today with skilled experts who use sterile, medical-grade tools and premium implant-grade jewelry.
Ready to book your industrial piercing consultation? Call Z Edge Piercing at (941) 378-0914 to set up your appointment with our professional piercers.
